Valery Hronusov has been playing with Google Earth 4.2 beta’s implementation of KML 2.2, and has come up with a couple of things worth sharing:
Flash: On Windows machines (but not Mac and Linux), you can embed a whole Flash applet in a placemark popup balloon (not just YouTube videos), and it will work just as if it were in a browser.
Webcams: This works on Mac, PC and Linux versions of 4.2, so it is immediately useful: Have a <PhotoOverlay> point to an image generated by a webcam, and set the <refreshInterval> tag to the same interval as the webcam’s interval. Voila, a webcam image that is perfectly positioned:
(Notice how the small thumbnail image refreshes as well.) Here’s the specific snippet of code that Valery used to get a one-second interval refresh rate:
<Icon>
<href>http://www.url.to.image.jpg</href>
<refreshMode>onInterval</refreshMode>
<refreshInterval>1</refreshInterval>
</Icon>
This is definitely the way forward for georeferenced webcam images. (Remember that if you want to check out the KML code for yourself, just select a placemark, choose the Copy menu item and then Paste into a text editor. You’ll get the KML code.)
While playing with Valery’s placemark I found something this blog has overlooked until now:
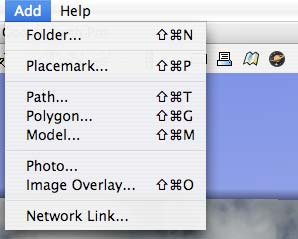
Built-in PhotoOverlay controls! It turns out that rolling your own PhotoOverlay is not nearly as difficult as I had assumed. There is no need for a highly sophisticated robotic camera positioning system to record the heading, tilt and roll of a shot (though I still want the future camera that will record such data automatically as EXIF:-) — instead, just use the new Add > Photo menu item:
You then get a wonderful control panel for editing every conceivable parameter of the photo you want position:
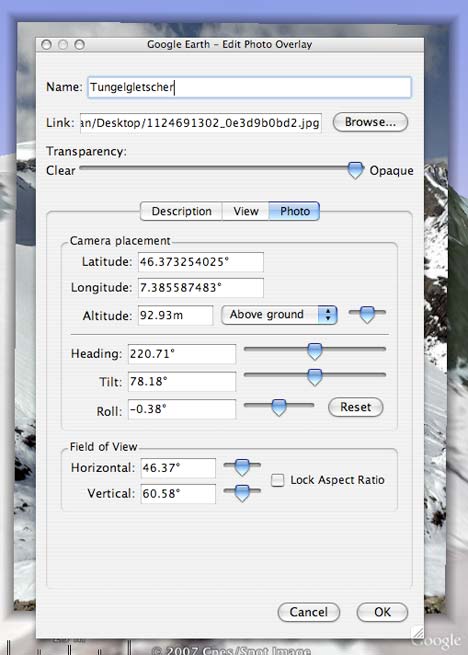
I used the normal camera controls to get into a rough position, and then used the fine-tuning controls on the panel, which are very sensitive indeed. Especially nice is the ability to unlock the aspect ratio for the field of view. In my case, the end result proved quite respectable, for a quick effort:
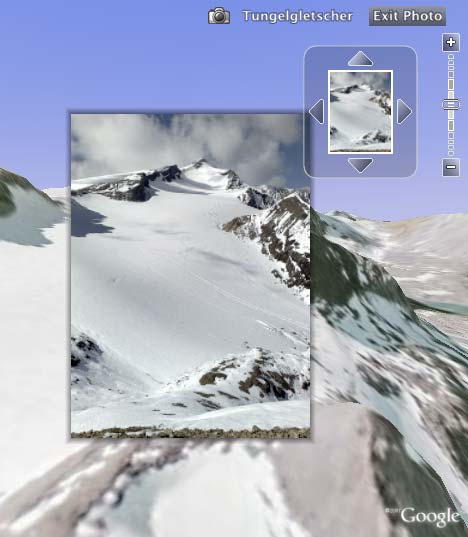
While I am sure you are by now completely sick of my Alpine trek pictures, such landscape photos are practically crying out for the PhotoOverlay treatment. Luckily, I am going to be very busy this coming week so I doubt I’ll be able to subject you to any more PhotoOverlay-enhanced holiday snaps for the foreseeable future:-)
All this does imply the question: Might there not be a way to go and update Panoramio photos with an enhanced PhotoOverlaid version soon? If everyone takes responsibility for their own shots then we’ll be done in no time:-)
A thing worth saying is that the WebCam only works in the DirectX mode and not in OpenGL.
I have Windows XP and Google Earth 4.2.
Inserting a photo like you do it’s nice but as soon as you want to integrate a very large photo (for example a nice panorama of 180 degrees and you have to create an in order to be able to navigate inside the photo things get complicated.
I wished someone had yet written the necessary scripts to create the tiles and the corresponding KML-tag for large images :) But I see, I’ll have to do it by hand :)
In the previous post should be written the sentence:
…you have to create an imagepyramid-tag in order to be able to navigate …
Hmmm, this new functionality could allow the beginnings of MS Photosynth-like capabilities for GE – think lots of partly overlaid photo-overlays from similar perspectives, with smooth panning and fading between them…
Matidio, I have cobbled together a couple of Photoshop scripts for making ImagePyramid tile sets. Also there is another method that doesn’t need Photoshop.